Monday, March 17, 2014

Headboard assembly project: CONQUERED!

I consider myself to be pretty handy, but given the right circumstances, I will shy away from a project now and again. Recently, we've decided to move our youngest to a big boy bed, and my parents generously purchased one for us-some (read: ALL) assembly required. I put it off since it required removal of non-baby-safe objects from his room and increased supervision to make sure he stays in his room overnight. This week, we will need an extra bed, so I decided now's the time and tackled it. Here's how it all went down during naptime today.

Step 1, 1:42pm: This is what I started with.
Not so intimidating, right?

Step 2, 1:48pm: Commence Inventory and gather tools. Check!
Note: King Cryolophosaurus is keeping me in line. 

Step 3, 2pm: Read Instructions
Crap-it says 1 man is not enough! Thank goodness I have the King here with me.

Step 4, 2:05pm: Commence construction
\
(Censored-This is a FAMILY blog, after all!)

Step 5, 2:49pm: Complete!
FYI: it's face down because I still have to nail the backing down. The baby is sleeping, so that has to wait.

Turns out, the instructions say you need 2 men to do the job, but I only needed 1 woman!
(Sorry, King!)


I AM WOMAN! HEAR ME ROAR! 

Thursday, February 20, 2014

Welcome to the Circus, Ladies and Gentlemen!

I always joke I run a circus, not a household, and that I should charge admission rather than post our adventures for free on FaceBook. Today's events are further proof I run a circus.

10:30am: resolved not to be late to 1130 lunch date with my Aunts to celebrate 2yr old's birthday a little late. Start kids on bathroom trips, acquiring shoes, drinks, toys, etc.
10:35am:4yr old announces he needs to poop. <great, gonna be late anyway!>
10:45am: 4yr old announces he peed on himself and his clothes and shirt on the floor in front of the potty. <Really? Seriously?>
10:55am: Got the 4 yr old and bathroom cleaned and redressed and ready only to discover he'd left out the markers. While I was cleaning up the first mess, the 2yr old found the markers and inked a lovely mural on himself. <I didn't know we owned non-washable markers?!> Scrubbed till he was pink and gave up.
11:15am: in the car. Finally. <SO LATE, nevermind that there is now no time to go to the bank or get gas. Hope there's enough $ and gas. Probably not.> Screaming and fighting all the way to the restaurant. At photo-enforced intersection, light turns yellow while in intersection and driver in front of me inexplicably brakes so my tail is in intersection when camera flashes. <great, just great>
11:45am: lunch at restaurant. kids surprisingly well behaved. Compliments given to 2 year old on his green tattoo.
12:40am: drive to officemax to see an empty building for lease. Phone won't load alternate locations, so drive around looking. Found one in adjacent shopping center. Realize I don't know the model of my printer and phone is still uncooperative, but has no problem delivering the email that my bank account is overdrawn.
12:55am: leave officemax with ink i hope will work, since I had a little trouble reading the packages with any concentration, after offering (unsuccessfully) to trade my hooligans for the ink. Officemax staff was not impressed with their highly developed skills of knocking things off of shelves and running and screeching thru the store, so they declined my offer. Go figure. Got honked at while more than 20ft from a motorist on the cross street so I flipped her the bird (under the dash-must set a good example of passive aggressiveness for my kids!). 
1:15pm: at bank to make deposit and get cash and can't find ID. Turns out it was buried in my bag because I'd taken it out of my wallet and put it with the checks and it slid out from between them when I picked them up out of my bag. Fight with kids about why they don't get to eat the suckers the teller gave them.
1:55p: kids in bed for nap. Searched unsuccessfully for a corkscrew. Oh well. 2 yr old will never miss the rest of his birthday cookies. 

Good grief!

Tuesday, August 27, 2013

The World's Perfect Brownie Stands Alone

It's been a really long while, but I'm back at it again! And by 'it,' I mean improvising recipes. 

During the course of my recent revamp of the way I eat, I had a monster craving for chocolate and was at the limit of my calorie allotment for the day. (Pregnancy cravings didn't hold a candle to weight-loss cravings. YIKES!) In a moment of weakness, I began trolling Pinterest for recipes, preferably for only a single serving, but I was willing to eat a whole pan of brownies if I had to-you know, to hide the evidence. ;) Anyway, I found an awesome brownie-for-one recipe that is tasty and not super-bad for you! YAY!

ORIGINAL RECIPE ON SPARKRECIPES

Ingredients

    1 TBSP whole wheat flour
    1 TBSP sugar (do not substitute)
    1 TBSP unsweetened cocoa
    a pinch of baking soda
    a pinch of salt
    1 TBSP of low fat vanilla yogurt, add more if needed to blend the mixture

Directions

mix it all up, pop it in the microwave for just over a minute, enjoy :)

MODIFICATIONS:

I used full fat, plain yogurt instead of low fat vanilla. Low fat or non-fat plain yogurt would be just as good.
I also added about 10 chocolate chips (semi-sweet).
Clarification (not really a modification): I nuked mine for 1 minute and 15 seconds. (For reference, I have a 1050 Watt Microwave and used 100% power.)

I know, I know-Really! That's ALL I modified! 

VERDICT

It was a little spongy (maybe cook it less?), but for a 'healthy' brownie, the taste was SUPER AWESOME! This will be a go-to in my house for those chocolate cravings when just a plain handful of chocolate chips ain't gonna cut it!

*******************************************
Edit to add: I tried it again, and I cooked it for only 1:05. It wasn't spongy at all!  

Wednesday, March 20, 2013

Perfect Blueberry Muffins.....no, really!

I have found perfection, and it is tasty!! This muffin recipe, found here at Smitten Kitchen met with rave reviews at my house, and I didn't even modify it. Much. Plus, I've fallen in love with baking with yogurt. It gives everything such a nice, moist texture!


The Recipe: 
Perfect Blueberry Muffins
Adapted from Cook’s Illustrated
Muffins are really best on the first day (another argument for halved recipes) but I’ve never met one I couldn’t resuscitate split, toasted and patted with salted butter.
My major changes: As always, attempted to rewrite this into a one-bowl recipe (because muffins should just not require a lot of work), halved the recipe and added weights.
Makes 9 to 10 standard muffins
5 tablespoons (2 1/2 ounces or 71 grams) unsalted butter , softened
1/2 cup (3 1/2 ounces or 100 grams) sugar
1 large egg
3/4 cup sour cream or plain yogurt
1/2 teaspoon grated lemon zest
1 1/2 cups (6 3/4 ounces or 191 grams) all-purpose flour
1 1/2 teaspoon (7 grams or 1/4 ounce) baking powder
1/4 teaspoon (1 gram) baking soda
1/4 teaspoon (2 grams) salt
3/4 cup (3 3/4 ounces or 105 grams) blueberries, fresh or frozen (if frozen, don’t bother defrosting)
Preheat oven to 375°F. Line a muffin tin with 10 paper liners or spray each cup with a nonstick spray. Beat butter and sugar with an electric mixer until light and fluffy. Add egg and beat well, then yogurt and zest. Put flour, baking powder, baking soda and salt into a sifter and sift half of dry ingredients over batter. Mix until combined. Sift remaining dry ingredients into batter and mix just until the flour disappears. Gently fold in your blueberries. The dough will be quite thick (and even thicker, if you used a full-fat Greek-style yogurt), closer to a cookie dough, which is why an ice cream scoop is a great tool to fill your muffin cups. You’re looking for them to be about 3/4 full, nothing more, so you might only need 9 instead of 10 cups. Bake for 25 to 30 minutes, until tops are golden and a tester inserted into the center of muffins comes out clean (you know, except for blueberry goo). Let cool on rack (ha), or you know, serve with a generous pat of butter.

Modifications:
*I did not have an lemon zest, so I just omitted it.
*I mixed with a whisk, not an electric mixer, since muffins that are over-mixed get really hard. 
*I do not own a sifter, so I whisked the dry ingredients before I added it into the batter bowl a little at a time. I'm glad I did-the dough was so thick, it NEVER would have integrated had I dumped it in all at once. 
*I used plain greek yogurt, no sour cream. 
*Before I put them in the oven, I sprinkled a little cinnamon/sugar mixture on top of the muffins. (I actually wanted a streudel topping, but was too lazy to make it.)
*Side note-her recommendation of an ice cream scoop was right on! It made 9 perfect muffins. 

The Verdict:
I had to fight to get two muffins for myself out of the batch. My three year old turned blue in the mouth and fingers, and he cried when I told him we didn't have any more. My husband said, "Those muffins are awesome! Can I take some to work for breakfast, please?" The best part is it only took about 10 min prep time and the ingredients were pretty basic. I love easy recipes!

I couldn't get a picture before someone took a bite out of it!


Thursday, March 7, 2013

I've been at it again! Suped up Broccoli Cheddar Muffins

The title of this post says it all. I really have been at it again. I know I've been off for a while. The holidays happened. Then all of us were sick for what seemed like forever. Then, just when I thought we were all getting better, the baby had an allergic reaction that landed us in the ER and on steroids for 2 weeks. Anyway, we're here now and on the mend. It's good to be back!

The Recipe:
Broccoli Cheddar muffins.
The recipe I started with can be found on cheese.food.com.
As per my usual modus operandi, I did not specifically follow the recipe, but only the general idea.

Ingredients:
4 large eggs
1/2 cup melted butter
1 1/2 cups shredded cheddar cheese
1 (8 ounce) package corn muffin mix
1 (10 ounce) package frozen chopped broccoli, cooked and drained
1/2 cup chopped scallion (optional) *I omitted


Directions:
In a large bowl, beat eggs with an electric mixer until light colored.
Add butter and cheese and mix on low.
Add muffin mix, broccoli and scallions and mix at low speed for another minute.
Coat a 12 cup muffin pan with cooking spray; divide batter among muffin cups.
Bake at 375 degrees for 15 minutes until light golden brown.
Cool on a rack before turning muffins out of pan.

serves 12
Modifications: 
*1/2 cup butter substituted with non-fat plain greek yogurt (1:1)
*8 oz corn muffin mix subbed with 6 oz mix and about 2 TBS whole wheat flour
*10 oz pkg frozen broccoli subbed with who knows how much? I had a 16 oz pkg on hand and didn't use all of it. I think it was close to 10 oz, maybe more. probably more.
*I also added about a cup of ham.
*I chopped up the ham and broccoli super fine so the baby would be able to eat these without too much help.
*I baked them for a little over 20 min on 375, till they were golden brown on top.

The verdict:
The texture was moist, but not gooey, and they were more filling than I expected. The kids tolerated them. It *is* broccoli, after all. I will definitely add these to my repertoire.

Bonus: They are pretty darn healthy (compared to the original) so I didn't feel guilty eating 3 in one sitting. :)
They look pretty yummy, no?

Monday, December 3, 2012

Ahh, a cleaning project completed feels so good!

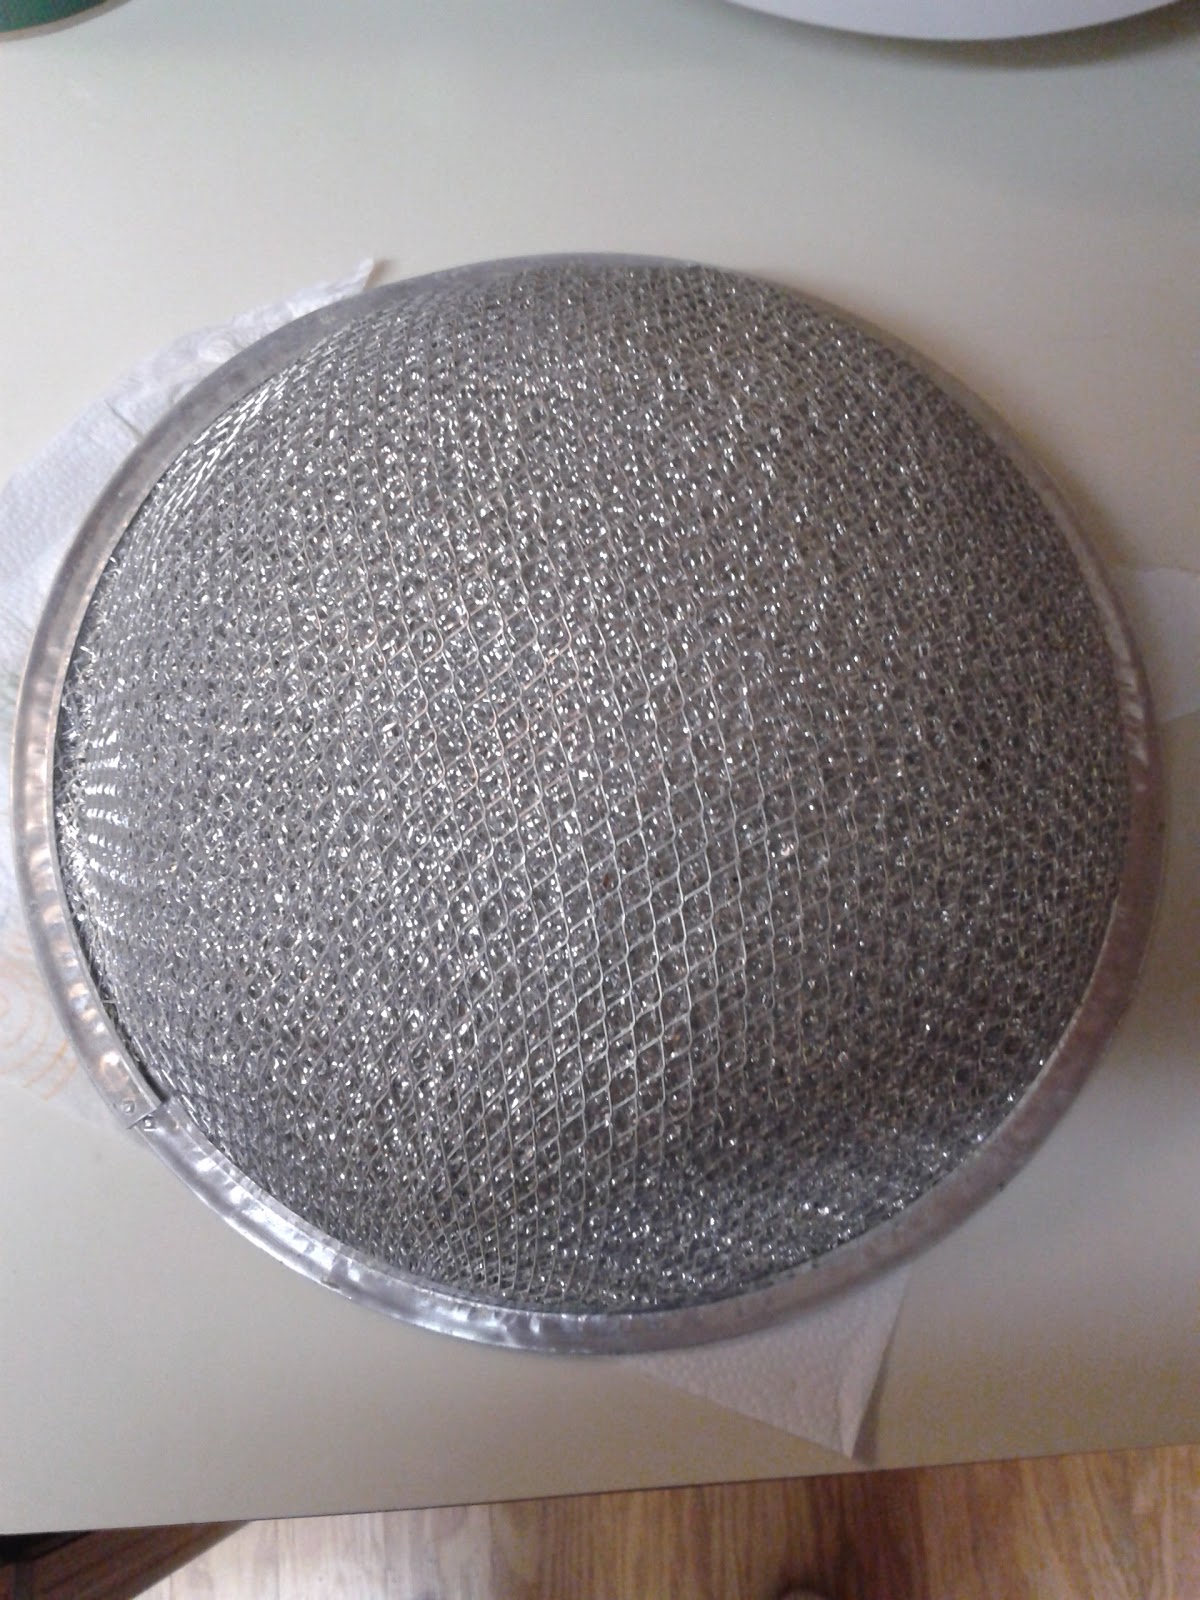
Today, I would like to pass on a little tidbit I found that actually worked better than expected. I have lived in the same house for almost 10 years. I have never cleaned the vent hood cover effectively. I am a clean freak, and this is completely out of character for me. However, it was not for lack of trying. I simply had not found anything that worked. It was so dirty, it was dripping grease down onto the stove. ICK! Over the years, I have tried soaking it in dish soap, running it in the dishwasher and other methods that have resulted in dirtying the appliances, rags and tools - sometimes beyond saving, but not making much difference in the caked-on grease on the filter. I came across a blog post on Pinterest from One Good Thing by Jillee in which she cleans her vent hood filter with boiling water and baking soda. She had amazing results, so I thought it was worth a try. I really had nothing to lose at this point.

I heated my 22 quart stock pot-overkill, I know but it was seriously DIRTY- to a boil. I only filled it about half full, but it seemed to take forever to heat that lake's worth of water! Then I added about 3/4 cup of baking soda. It does fizz, as the blogger mentioned, so be sure to leave enough room at the top of your pot to accommodate this. I put the filter in and boiled it for about 15 minutes, and the filter turned out like-new-clean. I retrieved the filter from the pot with a pair of tongs and rinsed it in tap water so I could touch it more quickly. Then I let it dry on a paper towel overnight. I should mention, it didn't fizz after that first burst when I added the baking soda, but after about 15 minutes of boiling, it started to fizz on its own like pasta beginning to boil over, so be sure to watch your pot, just in case.

Honestly, I didn't expect this method to work, so I didn't take "before" pictures. Turns out, I really should have since it worked beautifully. Here's the "after" picture. Nice and shiny!


Below is the pot after I boiled the filter. YUCK!


Even my husband was impressed! It feels so good to complete a cleaning project successfully, especially with so many unsuccessful attempts under my belt. 
Happy Cleaning!

Sunday, November 25, 2012

Thanksgiving dinner on a budget

So the holidays and a couple of viruses got the better of us (Colton first,then me) so that I didn't get to post these past weeks. However, I'm back and ready to share!

For Thanksgiving, we decided to host the meal to save us the trouble of packing and driving across Texas with two very small children. We made the traditional feast of stuffing, turkey, green bean casserole, mashed potatoes, rolls and of course, gravy. However, the prep was anything but traditional. Have you ever heard of working smarter, not harder? Well, that's me to a "T". For the stuffing, I didn't feel like cutting all the vegetables, so I got a "stuffing starter" from HEB (cut up veggies and spices) and then tweaked it to my liking. It turned out perfectly! Another cheat-I bought a pre-cooked turkey and warmed it in a roaster with chicken broth. Then, the night before and morning of the big day, I came down with a violent stomach virus. My mom and mother in law, and my Dad and step-dad and hubby stepped in and saved the day. Everything tasted great! (a day later when I could finally eat again, that is.)

I'm going to plug HEB here, but I bought almost all of our Thanksgiving supplies for <$50. My mom made the cornbread for the stuffing and the pumpkin pies, but I bought the turkey (~11lbs), canned goods, and stuffing starter, broth, potatoes, etc. The store does these deals where you buy the main thing and get so many items for free. This time, I bought a turkey, and for free, I got salad, ranch dressing, cookies, aluminum disposable roaster, and something else I can't remember now. At the end of the receipt, it said I had saved more than $26 over the course of all the BOGO deals, brand savings and the meal deal. I love my grocery store!

In summary, my family and I were able to pull off a fabulous Thanksgiving dinner while having a stomach virus, and all for around $50!